Saturday, April 27, 2019

Rescuing Thrudd

When last we left our heroes (to be read murder hobos) we had some loot to dig through before continuing onward.  The notable rewards from saving the village were a pair of blessed amazonian bracers, Belt of Blocking (yes a belt that blocks!), a fire blessed rod and a cube of terror (what a pretty puzzle box!).

While in the settlement everyone leveled up.  The knight even managed to obtain a new squire after murdering one that dared to challenge him at the barons castle!  The mage even got poisoned and will be at toughness 2 for the next adventure.

Now armed with sweet new champion skills and a few new toys we needed further employment, TO THE TAVERN!

It seems the circus is in town however they are missing their star attraction: Thrudd!  Even though we don't have the best record of escorting people back to the settlement safely we agree to find Thrudd and bring him back, for money.  Thrudd's manager gives us a backpack of fresh mutton and a chain, wishes our puzzled warriors good luck and pushes us out into the jungle.


Either we don't know how to leave a door open or someone is expecting us.  Once the warriors enter the dungeon the exit locks behind them they will have to find a way out or get a key somewhere within the dungeon.


Behind door number one is one of the new trap rooms: Rolling boulder!  Everyone in the boulders path either took a ton of damage or just had a stupid amount of armor and laughed (looking at you Bretonnian!).   This trap scales with level and luckily only hit four of our party before smashing into a hidden (and empty) t junction behind us and smashing to a stop.


We were starting to feel unwelcome after that introduction but the dungeon residents were quick to send out the fun wagon!  Skinks with javelins and the first of many Dark Elf Corsairs. I would quickly come to hate the fact that they aren't yet painted...


This first encounter wasn't too terrible and at least we were able to get that first unexpected event out of the way quickly.  I mean how often can a 1 in 12 chance come up (at level 2 the event die is now a D12 instead of D20).  We picked up a few useless books after the fight to sell later.


 The next room was caved in and couldn't even hold the entire party!  From behind came a cavalcade of elves and pygmies!  Corsairs have two 'saves' from any hit that we land.  One is a 5+ dodge and the other a 6+ ward.  This proves to cause a 2+ aggravation as so many of our attacks end up failing to cause any damage.


Slowly (and I mean slowly) we break through the ranks and get to the crossbowmen and pygmies quickly ending the fight.


This branch of the dungeon dead ends into the astral shaft so that key we just found in the last fight became a very moot point...


As we casually walk back to see whats behind door number 2, the mage points out the fine, yet rustic, arrow slits lining the wall and promptly rolls a '1' on the event die.


Suddenly he and everyone else in the stairway take arrows in the knee and either thank their armor or take massive damage!  The mage drops and requires a healing potion before we retreat from the room!

We left a nice note on the boulder door: Do not open, here there be bad things.


Apparently the dark elves don't like our note taking and the mage rolls yet another unexpected event.  This time dark elves and saurus scatter the party but are beaten back fairly quickly.


Not without bringing the ranger to his knees though!  We did manage to gain a 'decent' treasure this time, the cursed armor of the ancients.  Yes this counts as decent compared to books.


Finally a passageway without boulders, dark elves or even arrow slit ambushes!


The next room is of coarse full of dark elf corsairs.  This dungeon has a higher chance of forcing the nearest dark elf entry to the entry rolled.  We keep rolling corsairs, all the time.  They are super annoying and the fimir in the room really doesn't help either.


We nickel and dime the silly elves while the  fimir keeps going rounds with the jungle cat. After the knight gets his chance to earn some real honor taking out the fimir we grab a smuggler's ring (which does nothing unless a particular lustrian event comes up) and soldier onward.


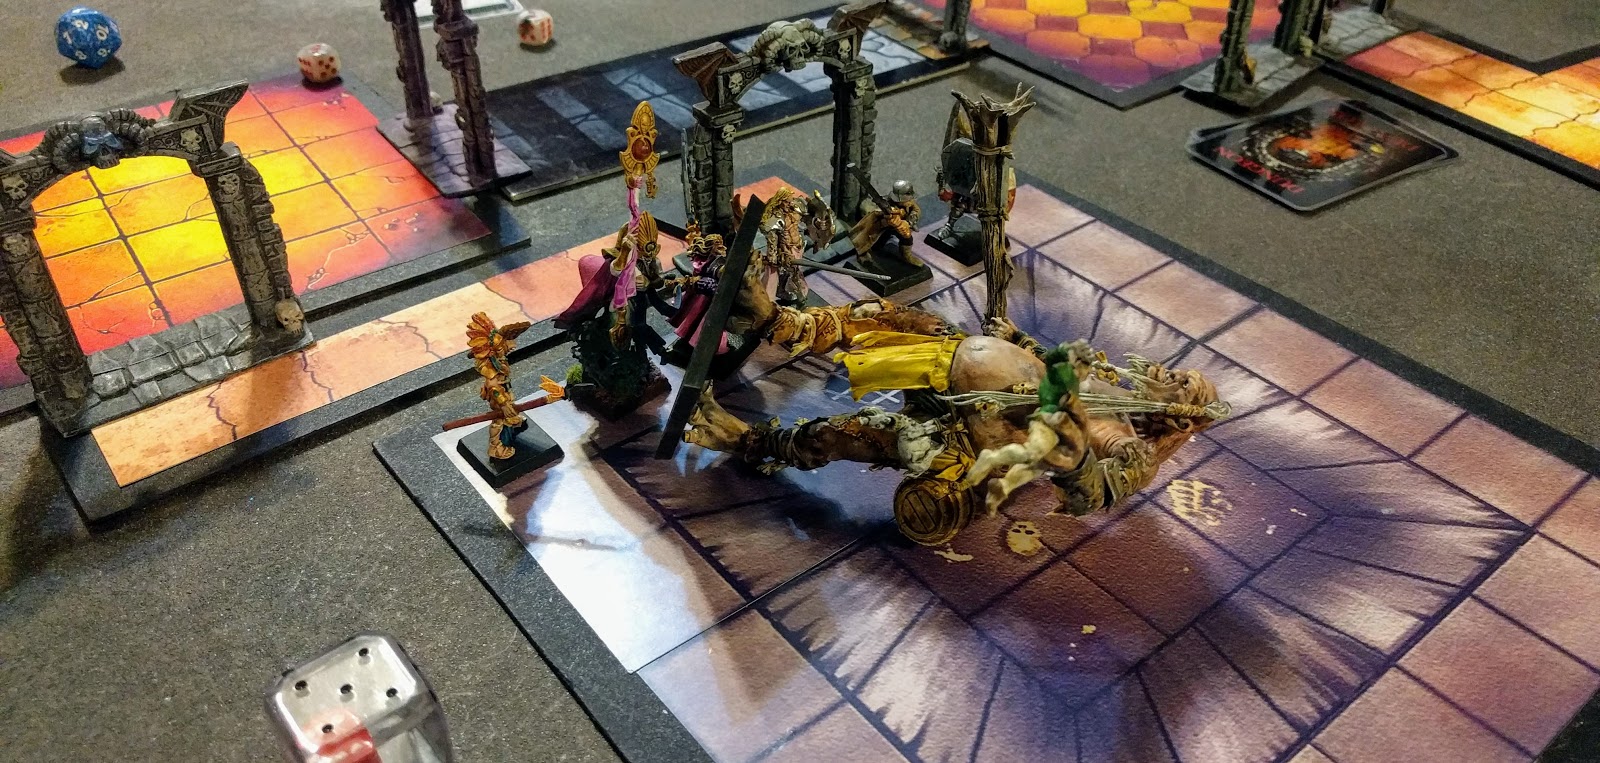
After a narrow corridor we find the objective room along with a GIANT (surprisingly no one questions how the giant got in here through the narrow passage)! This giant thankfully has a collar and a tag denoting him as our friend Thrudd, the star circus attraction.  Thrudd quickly wakes up the the smell of the mutton filled backpack and allows us to attach the chain with the amazon tentatively leading the monstrous creature...


The dungeon denizens however have no intention of letting us take this showstopper and the objective room (not to mention the dungeon) fill with a plethora of baddies!  Skinks with blowpipes, javelins, and corsairs fill the room while behind us more skinks,  and even a few skaven fill the passage behind.


All of these skinks (now with gang up) firing at some hapless warrior seems like a dangerous room at first.


Until Thrudd lazily swings a tree at the entire room and destroys the skink ranks in one turn taking a few of the less dodgy corsairs down as well!  Yes this is a full on giant ally at level 2!


With the aid of our wonderous super star the bone pit is quickly cleared and the knight moves into position alongside his squire to take on the skaven.


Sadly the squire with no name goes down against the rat ogre while the knight honorably takes his revenge!  This adventure brings up two questions though.  How did the giant fit in there and worse yet, how did a bunch of skinks and elves kidnap a giant!!

Thursday, April 18, 2019

Defend the Village!

Before departing to save a village from Chaos Dwarf slavers the warriors needed to recruit some help since their barbarian friend had prior obligations with a long stay in the tavern!  We pickup a random amazon and even a very trustworthy looking chaos warrior of Slaanesh.  What? We like the cut of his jib!

On our first week of travel the party is ambushed by plague priests and a few giant lizards.  Since we are a party of five every roll of monsters results in a second roll of monsters with only 25% appearing on the roll rounding up.  Thus lizards!


The rat/lizard combo doesn't offer much resistance even while surrounded and are quickly put down. We arrive at the village and setup watch waiting for our party crashers to arrive.


This adventure is setup very differently than most.  It consists of several passages representing the village streets and we all start in the fountain of light, representing the town square.  Each time the power die rolls a 1 or 2 an enemy counter is placed at one of the random entrances to the town and act like a blip in space hulk only revealing the monsters once it is within line of sight.

On a 5 or 6 however the town militia reinforces our heroes with a BL1 barbarian.  This gives us a fighting chance as the party will be instantly surrounded by enemies on three fronts and we can't afford to split up too much at this level.

After enough monsters are destroyed and revealed they will go into retreat and we can finally clean up however we will have to keep them out of the town square as if any monsters are in the room for 3 consecutive turns we will lose automatically!


The warriors setup around the fountain and prepare to meet the onslaught of dwarves! Soon the bodies will pile up...


The first raiding party arrives to the west with a group of chaos dwarves and a few hobgoblins.


We send one of the militia soldiers north to scout out the incoming raiders revealing a pack of black orc slaves and a chaos dwarf.  Keep in mind at this level we don't have a lot of tools to get around the high damage mitigation of these monsters so this can easily turn into a long battle of attrition.


Finally the other member of the militia bravely scouts the southern entrances preparing for whatever may appear later.


The knight and the amazon's jungle cat meanwhile prepare to tangle with the chaos dwarves coming out of the western entrance.


Our brave volunteer (volun-told?) militia solder sped off further northward to force the monsters to split their attention.  Who knows maybe he'll come out on top against those black orcs...


As the chaos dwarves (slowly, very slowly) advanced the mage fired off a phoenix circle to soften them up before they meet the battle lines.


Our little drummer boy of the north eventually meets the black orcs in one on three combat and somehow avoids getting hit for the first round of combat!


In the town square the ranger and chaos warrior hold the entrance against the chaos dwarf line.


A group of snotlings led by a chaos dwarf slaver emerge at the southern entrance and are met by this brute of a militia man.


Snotlings in a corridor may not be a major issue but hobgoblins and chaos dwarves sneaking up from behind causes some concern.  Especially when we don't have enough to fully defend the southern route at this point!


Thankfully another militia member has been volun-told to distract the raiders and use his one and only life as a delay tactic!


Just as the knight, amazon and her cat are starting to clear up the western route another group of snotlings with a chaos dwarf and hobgoblin in tow show up.  So much for reallocating our defenses...


Our brave militia soldier finally falls in the south after taking out a chunk of the snotlings. He will be remembered briefly as that first guy to die without a name...


Just in time however more militia reinforcements arrived to defend the soon to be overrun southern route.  Without this we surely would have lost the square!


Believe it or not, after several rounds the militia soldier in the north is still standing though gravely wounded.  Fight on drummer dude!


Both the ranger and chaos warrior however have been slowly taking wounds and rarely causing damage against the brutish raiders.  Too bad the mage just keeps having terrible power rolls and can't seem to turn the healing button on!


In the south out brave militia holds out, some to the bitter end...


Next to fall is our northern drummer who very nearly stuck around until the end of the battle!


As the knight finishes cleaning up the western route the amazon looks to defend the southern entrance alongside the militia.  Thankfully she has a spear and can attack from two spaces away!


Finally at this point the chaos dwarves have abandoned their slave raid and enter into an 'organized' retreat.  From this point forward they all gain the retreat special rule and have a chance of just runing away each turn that one of them falls in battle!


At this point the battle greatly turns in our favor as the power die cooperates and keeps a few nearly dead defenders alive and occasionally even zapping a few dwarves!


As the northern path begins to clear our militia line falters and tumbles in the south leaving the amazon to defend the pass.


But at this point the village defenders have rallied around the warriors (probably because we stopped sending them out as bait).  Two more militia troops show up to the battle and with some extra zapping the chaos dwarves break and run from the village on their short stumpy evil legs!


Not long after that the rest of the monsters either break or are mopped up by the defenders.  The village is finally saved after a long and exhausting battle.  Plenty of roasted orc for everyone now!

Saturday, April 13, 2019

Old Fashioned Grave Robing

When we last left off the bad news was that we were unemployed due to the untimely death of our archaeologist friend.  The good news is the guild didn't get word of this and another intrepid jungle explorer has hired us to clear out an ancient skink priest's tomb so the archaeologists can come in and study in peace!

After a few days in the settlement hover our band of murder hobos have picked up a few dark secrets.  The knight now considers his comrades as 'unworthy heathens' and will no longer share healing items or take damage in lieu of others until the end of the adventure.

On top of that the Ranger has eaten a few too many roasted skinks and is at -1 movement but gains ignore blow 6+ until the end of the dungeon!  The question is what might the other warriors be hiding?


The entrance to the tomb has a lovely cupboard.  Since this is a sidequest we just have to find the Palanquin chamber and clear it of a few monsters.  Should be no problem to get to pay day!


Since things aren't yet random enough we find a secret passage right off the bat from a treasure map found in the last town.  We decide to investigate this later and make our way into the tomb.  Searching the rustic yet lovely cupboards reveals 100 gold in the drawers.


The next room is one of the special trap rooms, The Pit.  once we enter the room the trap is sprung and all the warriors fall for the old collapsing floor trick and are forced into the pit. We all suffer some minor damage and instead of monsters an old rusty trap is 'sprung' or not because it malfunctions and we leave with a bruised ego.


After climbing out of the mildly annoying pit trap we find ourselves peeking into the great hall.  A small portion of the room has caved in though nothing looks to suspicious yet.


Scampering out from behind the pile of rubble a gagle of forest goblins assault the party.  Even at level one these greenies don't pose much of a threat to us and are quickly dispatched. As a side note don't worry next time they will have more color...


The explorers press on and enter a sandstone room with a tomb in the corner.  Oh and snakes, why does it always have to be snakes!  At this point its time to discus the most devilish part of Lustria: Jungle Poison.  Each time a monster with jungle poison simply hits anyone they gain a jungle poison counter.  At the start of each turn for each jungle poison counter you lose 1D3 wounds with no modifiers.  This can be a real pain throughout most of the setting.  Of coarse snakes have it.


As we whittle down the snakes the knight gets bored with choping of snakes and under the influence of that sweet sweet snake venom decides to open up the tomb...


As one would expect, any time a tomb is opened up in the Warhammer world the undead have to pop out and try to murder you!  During the battle the ranger does go down to jungle poison but we do mange to get the better of these rattling bones.


For our troubles we gain the Ring of the North for +1 movement and willpower.  Though the knight has earned it this time he hands it to the elf ranger just to offset his magical fat abilities and maintain a movement of 4.


The next room is a simple t junction leading to the final card of this wing which just happens to be the Palanquin chamber!  Oddly it is infested with pygmies which just love to fire their blowpipes full of jungle poison into our warriors.


Our murder hobos, true to their nature, waste no time in dispatching the little guys and completing the main objective.  For our treasure we roll up a treasure map and begin to find our way towards its glittery spot marked with an X.


Walking back along the familiar path we realize the secret door the treasure map was pointing too was the conspicuously non door clad T-junction!


Not only is the treasure guarded bya rather nasty Fimir but after a choking gas trap some stinky skinkies join in.  They form a nice neat firing line of, you guessed it, jungle poison!


Since the knight really wanted the solo XP (well honor really), we all sat around for several turns as he went toe to toe with it.  Oh yeah and we took care of those backline skinks with some lightning zaps and a bit of stabby stabs!

In the hidden treasure cache we find an enchanted shield (which grants a ward save but explodes eventually!), The amulet of the west (to go along with our ring of the north!), the Rune of destruction to bind to a weapon and and obsidian axe.  This smattering of treasure is a nice start to our collection.


You might have noticed that we haven't had a ton of unexpected events.  This version of WHQ uses a seperate die for the event die that ranges from a D20 at BL1 down to a D6 at the later levels.  This gives the earlier levels a bit of a break but once in a while you still get hit with an ambush or two.

This time a group of savage orcs and forest goblins have decided to ambush us.  As per usual orc special tactics they have decided to attack while we have the high ground...


This works about as well as you might think and we hack through the orcs quickly.  Due to our obvious superiority we decide not to explore the rest of the dungeon and head back before another employer ends up dead with a debt to us!

Heading back to the settlement we grab our paycheck and restock as much as we can.  At this point we really need to save up to get to level two at which point the imperial guild of actual names will grant us real names and possibly new pants.

Meanwhile the Ranger gets into a tif with an assassin who nearly murders him but he escapes death for the day.  The knight decides to go for a skinny dip in the ocean and leans a valuable lesson about swiming with sharks and sudden painful bites.

Our intrepid warriors next hear of a  nearby village that is plagued by Chaos Dwarf slaver raids.  Without asking how the chaos dwarves crossed the big blue wet thing, they immediately see cash rewards and decided to 'help out'.  Next time we get to crack open the Chaos Dwarf expansion for the first time!