Tuesday, May 21, 2019

Gromril Plundering

Putting the knowledge that demons live beneath the Baron's castle the warriors go about their day preparing for the next adventure.

The Barbarian  spends his time drinking away their previous failure and ends up atracting a BL3 assassin!  Thanks to a failed ambush he's able to come out on top and walks away from the battle.


Going back to the Baron's castle the knight is challenged by four other knights and pretty much wipes the floor with them!

It appears this area is just lousy with Lustrian chaos dwarves as a nearby dwarf hold has been recently taken over by the stunties, nearly re-taken by good stunties and finally abandoned.  The good news is there may still be gromril within the mine so its off to the hunt for riches we go!


We end up with yet another dungeon that requires us to roll 2D6 for power and choose the highest, however on any doubles an unexpected event is to occur.  This will be a slog. The knight however has gained a blessing from the lady of the lake and reveals the path ahead, slightly.


The molton room contains a tomb (fairly warm one at that) and plenty of saurus!  Considering our last battle this is blessedly easy.


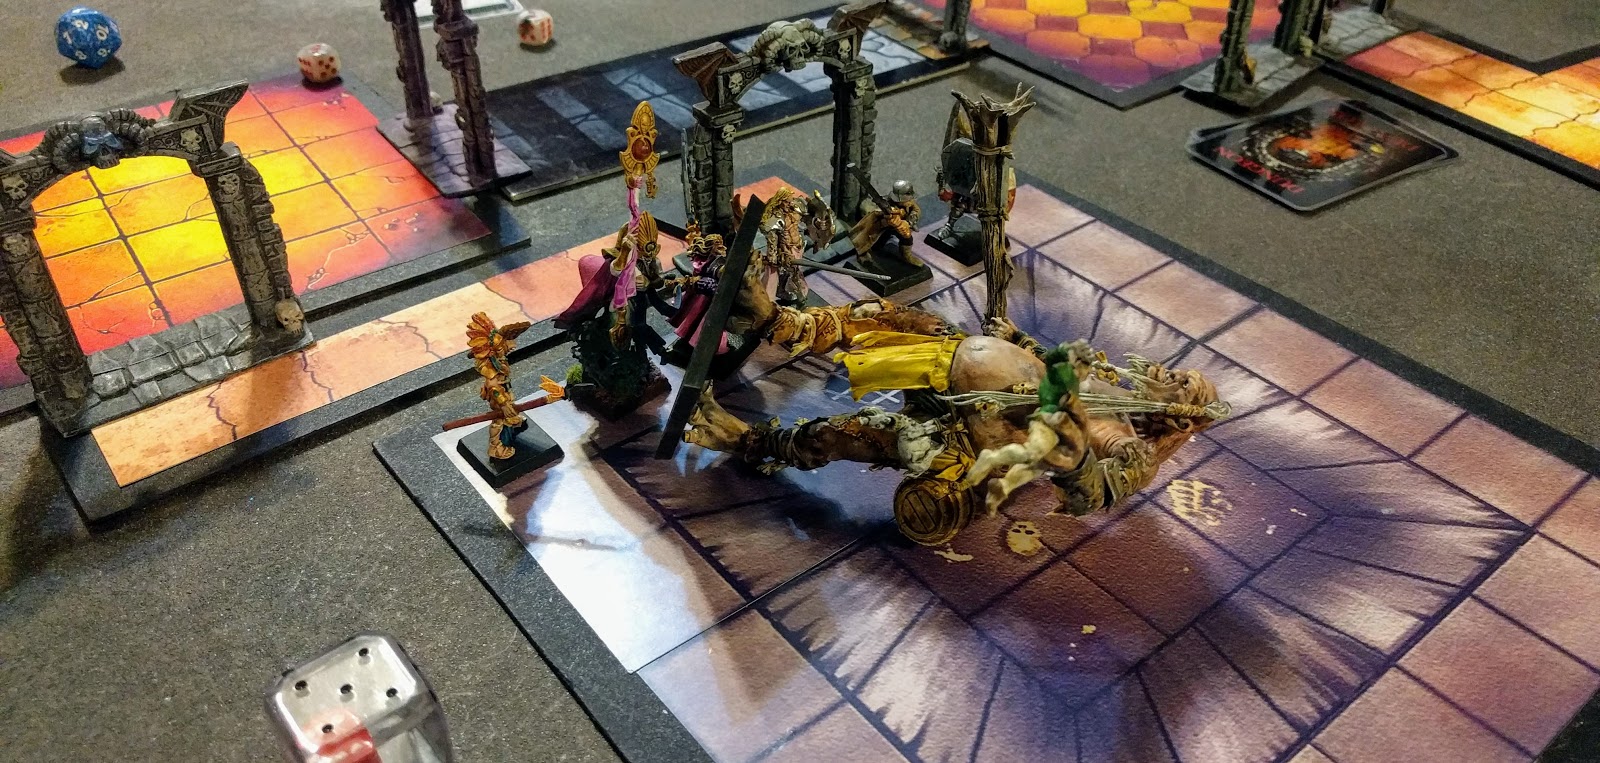
Obviously not all of the chaos dwarves were cleared out of the mine. A chaos dwarf champion and several minions.

The chaos Dwarf Champion was rather loaded with magical items.

   The hobgoblins manage to drop the ranger to zero however we are far more equipped to break through the dwarf armor at this point the beat, cut and zap our way through the creatures.

They did leave behind a +1 permanent wound scroll so we add an extra wound to the wizard. On top of that we even get 200 gold from the chest in the corner!


Because WHQ is full of random the next room is a bridge over troubled lava with a well.  At least the chaos dwarves make sense!  The fun part is that the warriors keep losing turns and going prone due to the heat.

During this battle we roll two unexpected combat events, one makes the ranger pass out for a turn and another gives the one enemy left on the board at the time a free turn (that could have been a bad time earlier...).


This ends up splitting us up quite a bit but somehow we manage to find the end of the path (a dead end) and get out the bridge room without an unexpected event.


Oh look the dice remembered that we get unexpected events on doubles again! Another annoying encounter of savage orcs is quickly dispatched.


Hey look more unexpected events!  Just as a we finished off the savage orcs now skinks and saurus want to pick a fight with us!  We are thankfully getting pretty lucky with the easy encounters here.


The undermines present us with a battle against ghouls (seriously hitting all the easy encounters here) and three different paths. The catch is there's a chance that when an entrance is explored it may simply be a fake path and waste our explore phase removing the door.


After sorting out our options we choose the path that DOESN'T lead into a spider lair and move on.


And we end up with rats instead. The skaven chieftan even has axe of skulls (frenzy 3+) and armour of carnage which further increases his attacks and comes back to life once the owner is killed! Just to make the battle a little more interesting we roll a magic drain event and ALL of our magical items/equipment/spells are turned off for a turn.


We wade through the rat high room and eventually finish off the last few rats after a portcullis slams down and is unlocked (thanks dwarf prospector!)


At this point we've lost count of how many unexpected events have transpired, but its a lot.  More chaos dwarves and hobgoblins this time throw themselves upon our magical weapons and spells!


After moping up the last of the dark dwarves we are ambushe by more lizardmen before we can even get our of the hallway.  By now we are tired of the carnage and take our frustrations out on the skinks...


We roll the best possible result for idol of Hashut and barely encounter resistance as we pick up the final key to the dark forge.


The last chaos dwarf tries to raise a battle of dread in an unexpected event but we teach him a lesson about trading shields for banners.


Heading back to the spider lair we encounter a lone stranger offering us something rare and mystical.  Annoyed and caked in the gore of dead monsters he quickly realizes what a bad time it is to try to sell something and runs in terror.

In the dark forge itself we encounter a few blunderbuss dwarves who are forced to setup to close for their own safety and three bull centaurs.


The bull centaurs are certainly no joke at this point but the blunderbuss fall quickly.  Eventually we drop the centaurs and pack our bags with the gromril which is worth a small fortune for sure.

By now the warriors are heavy with magical items and weapons well prepared to move up to BL 3...

Saturday, May 4, 2019

A Dangerous Trial

Well there isn't a lot of fame to be had from returning a giant to town (everyone tends to be focused on the giant you've brought back).  We did however end up with a decent bit of gold and items.  The knight checked in with the baron's castle right away and ends up getting a beat down in a jousting tournament and then a relaxing swim with sharks (yes its a theme for us).

The barbarian heads to the tavern and ends up picking an arena fight with an Ogre.  This goes as well as one might think and the ogre gets pummeled into the tavern floor but is only knocked out.

The ranger yet again attracks the attention of an Assassin, this time a BL 4 one!  Even though this one was two level higher the ranger comes out on top with some luck, barely.

We did end up finding a new quest and for some reason though we could handle a +1 BL dungeon!  This one comes from the (nearly finished) Traps! expansion: The Trial.  The horrendously eccentric baron of this port has created his own dungeon, setup plenty of traps and stocked it with dangerous monsters.  The obvious next step is to invite a few morons, er, heroes to best its challenges for reward and fame!


 This is an odd thing for a baron to invest his gold in for sure but the khornate symbol on the first doorways makes us wonder if its madness or corruption that built this dungeon...


 Turn 1 step one: roll a 1!  The first encounter is a nasty one with a selection of skinks and saurus and much worse, a saurus champion on cold one!  The cold one charges in targeting the barbarian pushing the ranger into range of all the saurus spearmen who have gang up at this level...


The saurus and skinks are blasted sworded away fairly quickly but the gold one mounted champion keeps beating our barbarian down until he becomes the first to hit the floor.  Thanks to the permanent injury table he even gains a concusion (bad treasure for sure).  This will reduce him to WS 1 for the rest of this adventure!


This causes the mounted champion to send his attacks (the cold one ate the barbie...) against the elf.  Thankfully we still have healing potions!


Eventually we bring down the cold one and are left with the champion itself.  The battle doesn't last much longer and we finally get to move on to the exploration of the dungeon.


The first room discovered is the crocodile pit.  The Baron may be mad but our sanity is in tact enough to try another door!  We nope out of that path right away.


And wouldn't you know it another '1' is rolled on the event die and we get our first demons (which per the scenario are more likely to show up in this dungeon).  Stocking the dungeon with lizardmen is one thing but summoning demons to infest your hobby dungeon?  We should probably not live in this port anymore...


We make short work of the nurglings but yet again a 1'1 is rolled before we can regroup and we have to carve our way through a few witch elves and shades! The shades have hit and run so the one remaining shade at the end of the turn runs away to join the next monster group.


Finally the event die behaves and we end up staring into the bridge of peril.  This isn't a particularly nice room to find but it seems less dangerous than the crocodile pit as in there monsters can throw you in and destroy the party!


The party (foolishly) jumps onto the bridge and we roll for the monsters, two groups, one at BL 3 and another at BL 4...

Pink horrors and  flamers are bad enough at this level but rat ogre champions and jezzails make it much worse!


The bridge rotates and the mage summons a fimir to aid us from the cube of terror.   Our weapons are nigh ineffective against the rat ogres and their damage output forces the mage into a healing role instead of a nuke role.


We get lucky with the pink horrors as they aren't casting any tzeentch magic that we can't deal with however the barbarian and ranger are dropping every turn to the 8 rat ogre attacks !


Some of the jezzails at least get set on fire by the Tzeentchian flames but the rat ogres are barely wounded at this point and the mage is not built to keep up with the healing duties!


The bridge finally rotates after a few painful turns and after a quick negotiation we get out of there fleeing an inevitable death.


As we flee the monsters load onto the bridge to catch up but as difficult as this room is to clear, its even harder to catch up to a fleeing party and we get out of the dungeon easily.  Our lives are in tact but our pride is badly inured.

We did spoil the rest of the dungeon and it turns out we just had the accursed treasure room followed by our exit room, which would have had objective room monsters.  Certainly with the bridge monsters in pursuit this would have been a death trap but at least we didn't go down the wrong path!

Saturday, April 27, 2019

Rescuing Thrudd

When last we left our heroes (to be read murder hobos) we had some loot to dig through before continuing onward.  The notable rewards from saving the village were a pair of blessed amazonian bracers, Belt of Blocking (yes a belt that blocks!), a fire blessed rod and a cube of terror (what a pretty puzzle box!).

While in the settlement everyone leveled up.  The knight even managed to obtain a new squire after murdering one that dared to challenge him at the barons castle!  The mage even got poisoned and will be at toughness 2 for the next adventure.

Now armed with sweet new champion skills and a few new toys we needed further employment, TO THE TAVERN!

It seems the circus is in town however they are missing their star attraction: Thrudd!  Even though we don't have the best record of escorting people back to the settlement safely we agree to find Thrudd and bring him back, for money.  Thrudd's manager gives us a backpack of fresh mutton and a chain, wishes our puzzled warriors good luck and pushes us out into the jungle.


Either we don't know how to leave a door open or someone is expecting us.  Once the warriors enter the dungeon the exit locks behind them they will have to find a way out or get a key somewhere within the dungeon.


Behind door number one is one of the new trap rooms: Rolling boulder!  Everyone in the boulders path either took a ton of damage or just had a stupid amount of armor and laughed (looking at you Bretonnian!).   This trap scales with level and luckily only hit four of our party before smashing into a hidden (and empty) t junction behind us and smashing to a stop.


We were starting to feel unwelcome after that introduction but the dungeon residents were quick to send out the fun wagon!  Skinks with javelins and the first of many Dark Elf Corsairs. I would quickly come to hate the fact that they aren't yet painted...


This first encounter wasn't too terrible and at least we were able to get that first unexpected event out of the way quickly.  I mean how often can a 1 in 12 chance come up (at level 2 the event die is now a D12 instead of D20).  We picked up a few useless books after the fight to sell later.


 The next room was caved in and couldn't even hold the entire party!  From behind came a cavalcade of elves and pygmies!  Corsairs have two 'saves' from any hit that we land.  One is a 5+ dodge and the other a 6+ ward.  This proves to cause a 2+ aggravation as so many of our attacks end up failing to cause any damage.


Slowly (and I mean slowly) we break through the ranks and get to the crossbowmen and pygmies quickly ending the fight.


This branch of the dungeon dead ends into the astral shaft so that key we just found in the last fight became a very moot point...


As we casually walk back to see whats behind door number 2, the mage points out the fine, yet rustic, arrow slits lining the wall and promptly rolls a '1' on the event die.


Suddenly he and everyone else in the stairway take arrows in the knee and either thank their armor or take massive damage!  The mage drops and requires a healing potion before we retreat from the room!

We left a nice note on the boulder door: Do not open, here there be bad things.


Apparently the dark elves don't like our note taking and the mage rolls yet another unexpected event.  This time dark elves and saurus scatter the party but are beaten back fairly quickly.


Not without bringing the ranger to his knees though!  We did manage to gain a 'decent' treasure this time, the cursed armor of the ancients.  Yes this counts as decent compared to books.


Finally a passageway without boulders, dark elves or even arrow slit ambushes!


The next room is of coarse full of dark elf corsairs.  This dungeon has a higher chance of forcing the nearest dark elf entry to the entry rolled.  We keep rolling corsairs, all the time.  They are super annoying and the fimir in the room really doesn't help either.


We nickel and dime the silly elves while the  fimir keeps going rounds with the jungle cat. After the knight gets his chance to earn some real honor taking out the fimir we grab a smuggler's ring (which does nothing unless a particular lustrian event comes up) and soldier onward.


After a narrow corridor we find the objective room along with a GIANT (surprisingly no one questions how the giant got in here through the narrow passage)! This giant thankfully has a collar and a tag denoting him as our friend Thrudd, the star circus attraction.  Thrudd quickly wakes up the the smell of the mutton filled backpack and allows us to attach the chain with the amazon tentatively leading the monstrous creature...


The dungeon denizens however have no intention of letting us take this showstopper and the objective room (not to mention the dungeon) fill with a plethora of baddies!  Skinks with blowpipes, javelins, and corsairs fill the room while behind us more skinks,  and even a few skaven fill the passage behind.


All of these skinks (now with gang up) firing at some hapless warrior seems like a dangerous room at first.


Until Thrudd lazily swings a tree at the entire room and destroys the skink ranks in one turn taking a few of the less dodgy corsairs down as well!  Yes this is a full on giant ally at level 2!


With the aid of our wonderous super star the bone pit is quickly cleared and the knight moves into position alongside his squire to take on the skaven.


Sadly the squire with no name goes down against the rat ogre while the knight honorably takes his revenge!  This adventure brings up two questions though.  How did the giant fit in there and worse yet, how did a bunch of skinks and elves kidnap a giant!!